Raksha

Tutorial

Learn Raksha Like a New Commander

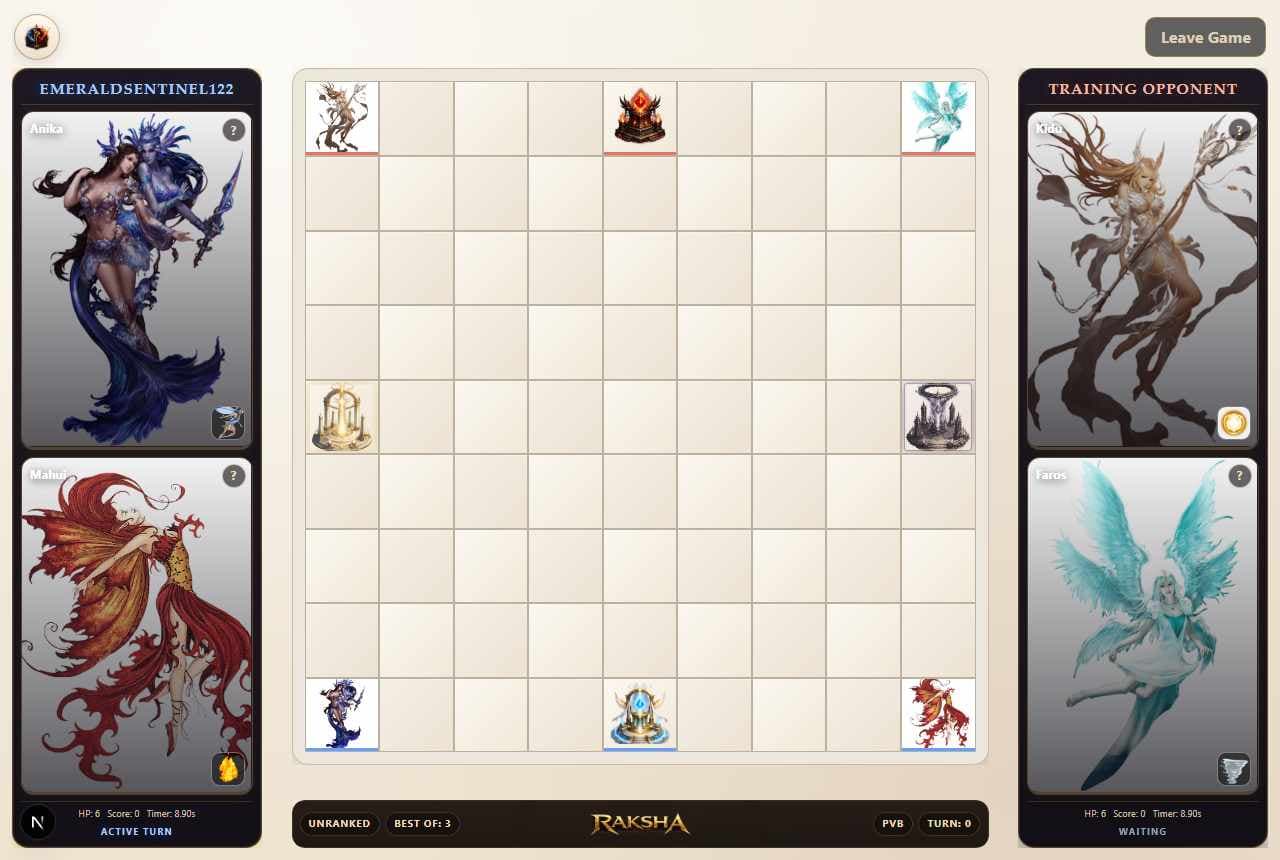
Start with the board, then practice the three actions that matter most: move, attack, and skill placement. Every example below uses real in-game screenshots from the live battle shell.

Best beginner routeBoard - Move - Attack - Skill - Altar
Quick reminderOne turn gives you one action only.

Quick Glossary

God Hero

Your main piece. God heroes move, attack, and place skills on the board.

Altar

Your stronghold. It can move, but it cannot initiate attacks. If the enemy destroys it, the round ends right away.

HP

Each side starts at the current configured HP value. A fallen god can cost 1 HP unless a blessing protects you.

Best Of

The series length. Win enough rounds first and you take the match.

Shrine

A special board objective that can bless a god hero after a full safe channel.

Blessing

A short power-up from a shrine. The exact effect depends on the shrine you claimed.

Skill Object

A placed skill that stays on the board and changes how both sides can move through that space.

Chaordic Pressure

A late-game safety system. Tied HP triggers Chaordic I, II, and III over time, while repetitive MOVE or SKILL loops can trigger Chaordic X.

Winning at a Glance

  • Break the enemy altar to end the round immediately.
  • Only god heroes initiate attacks. Altars can move, but they defend instead of starting duels.
  • Pressure enemy HP by winning the right duels and surviving the reply.
  • If HP stays tied through the Chaordic countdown, the arena compresses in stages. Repetitive MOVE or SKILL loops can also trigger Chaordic X and cost HP.

Chaordic Tile Patterns

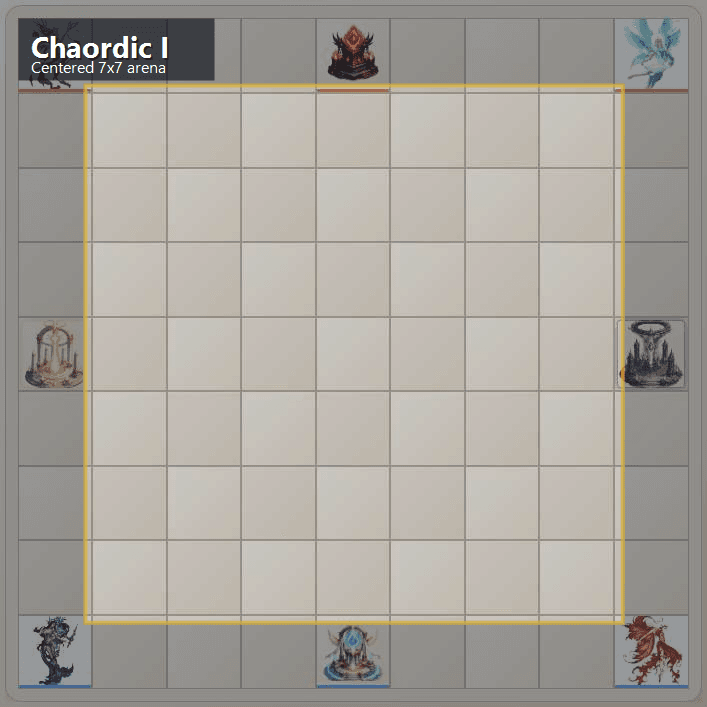
These examples use real in-game screenshots to show how the arena contracts through Chaordic I and II, then rotates through the 1st, 2nd, and 3rd Chaordic III void patterns.

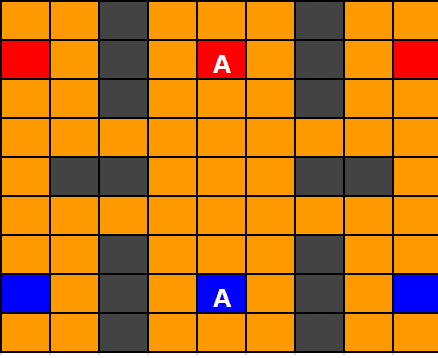
During Chaordic III, tiles that will become void on the next rotation now gain a very light Raksha-grey warning that darkens slightly as the shift gets closer.

Chaordic I

The first collapse trims the battlefield down to a centered 7x7 arena.

  • On the standard 9x9 board, the outer ring becomes inactive and the fight recenters immediately.
  • Gods, altars, and shrines re-form inside the new bounds before play continues.
  • Break the HP tie before the next countdown ends if you do not want the arena to contract again.
Actual Raksha board screenshot showing the Chaordic I 7x7 active arena.
Chaordic I: the real board contracts to the centered 7x7 arena while keeping the same lane geometry.

Chaordic II

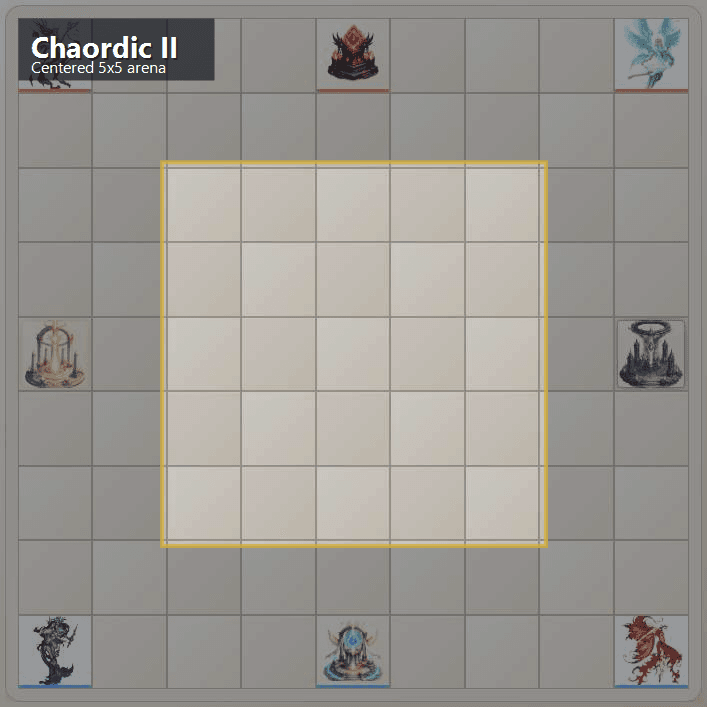
The second collapse squeezes the battle into an even tighter 5x5 core.

  • A second full tied-HP countdown collapses the arena one more ring inward.
  • The smaller 5x5 field makes shrine access, altar lanes, and forced duels much sharper.
  • If the tie still survives after this, Chaordic III resets the full board and starts rotating void patterns.
Actual Raksha board screenshot showing the Chaordic II 5x5 active arena.
Chaordic II: the live arena narrows to 5x5 before the final Chaordic III reset arrives.

Chaordic III - 1st Pattern

The first rotating void pattern opens side lanes and a split midline pressure point.

  • Chaordic III resets the 9x9 battlefield and keeps shrines plus skill casting active.
  • Starting here, gods and altars respawn closer to the center on each side of the board.
  • A very subtle Raksha-grey hint now appears on tiles that will become void on the next rotation.
Actual Raksha screenshot showing the Chaordic III 1st void pattern.
Chaordic III 1st pattern: the first live rotation after the full-board reset.

Chaordic III - 2nd Pattern

The second rotation shifts the void lanes and changes which center entries stay safe.

  • Every 6 rounds, the active Chaordic III void pattern relocates to the next layout.
  • If a new void tile catches a god or altar, that piece resets to spawn or the nearest valid tile.
  • Skill objects caught by the incoming pattern are destroyed immediately.
Actual Raksha screenshot showing the Chaordic III 2nd void pattern.
Chaordic III 2nd pattern: the second rotation changes the center approach angles.

Chaordic III - 3rd Pattern

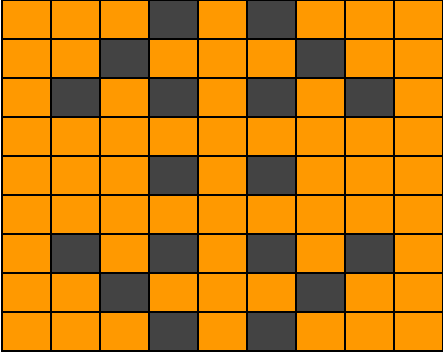
The third rotation tightens the center spine before the loop returns to the 1st pattern.

  • The full loop is 1st, then 2nd, then 3rd, and then it repeats until the match ends.
  • Use the upcoming-tile hint only as a soft warning, not as a replacement for reading current legality.
  • Chaordic III still has a hard failsafe turn cap: 150 on 9x9, 120 on 7x7, and 90 on 5x5.
Actual Raksha screenshot showing the Chaordic III 3rd void pattern.
Chaordic III 3rd pattern: the final rotation before the loop returns to the 1st pattern.
Step 1

Meet the Board

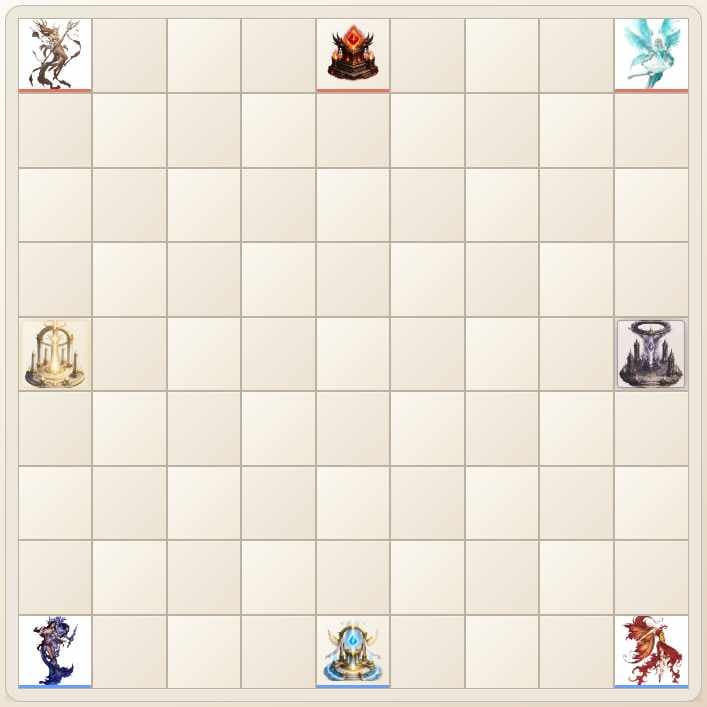
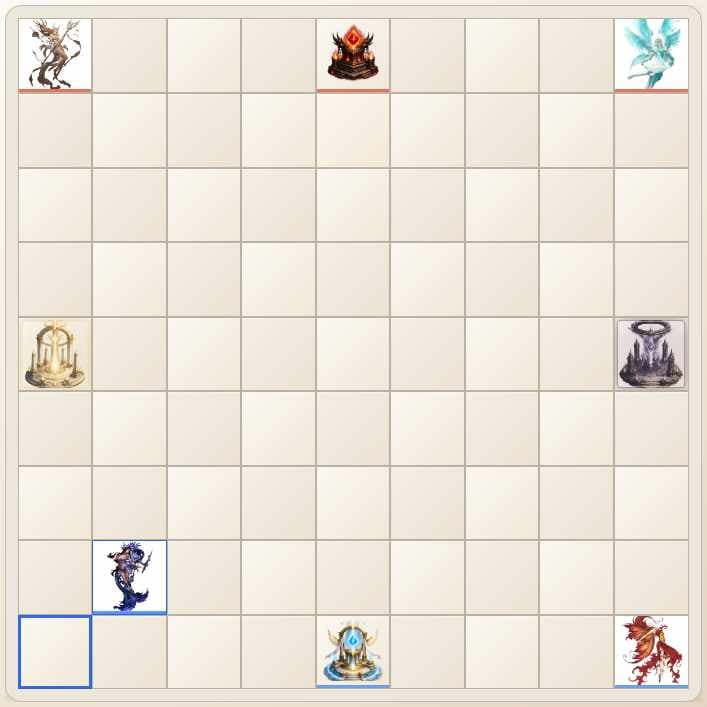
Start by learning which pieces belong to you and which side you are trying to break.

  • Your god heroes and altar begin on one side of the board. The enemy begins on the opposite side.
  • Blue and red ownership markers help you read who controls a piece at a glance.
  • Your first habit should be checking the lane between your heroes, the shrines, and the enemy altar.
Raksha board overview showing both sides at the start of a match.
Your god heroes and altar
Enemy god heroes and altar
Board view: your side starts opposite the enemy side.
Step 2

One Turn, One Choice

Every turn is one meaningful action: move, attack, or place a skill.

  • Drag a hero to a safe square when you want to reposition.
  • Only god heroes initiate attacks. Altars are move-only and defend when an enemy attacks them.
  • Tap a hero to enter skill-target mode and place a skill on a highlighted square.
A Raksha hero being dragged with legal move squares highlighted.
Your selected hero
Valid move squares
Move: drag a hero and follow the highlighted legal squares.
A Raksha hero pushing up the lane toward enemy pressure.
Advance from here
Enemy lane
Attack: push your hero up the lane until an enemy target opens.
A Raksha hero in skill-target mode with legal skill tiles highlighted.
Tap your hero first
Then pick a highlighted square
Skill: tap a hero to show where its skill can be placed.
Step 3

Drag to Move

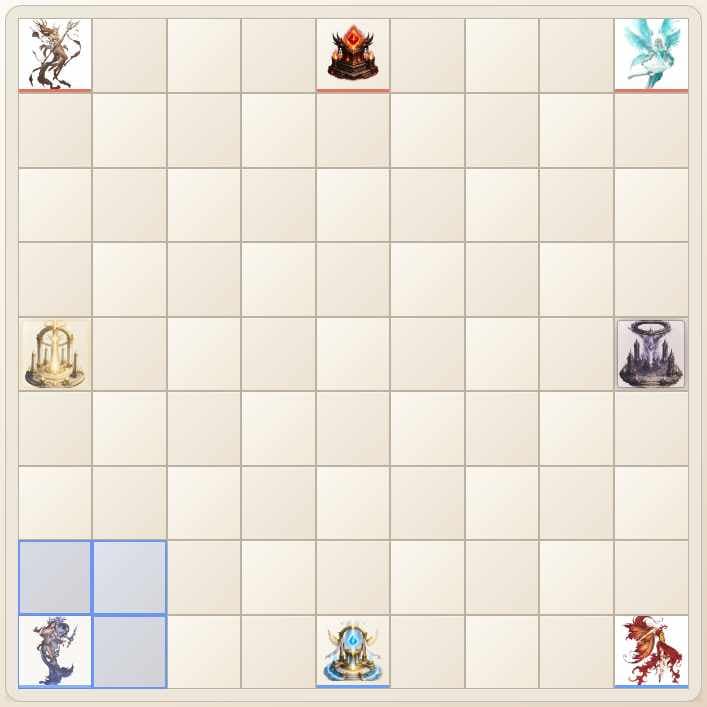
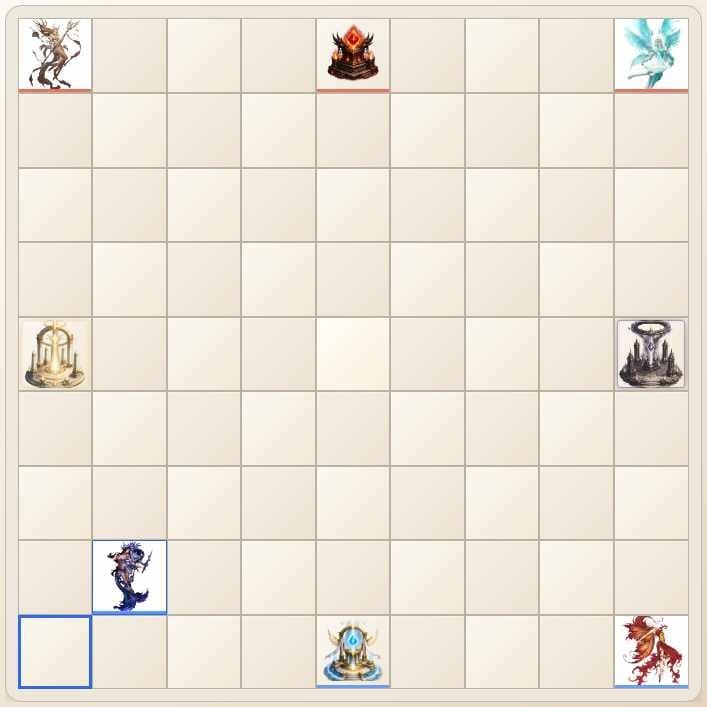
Movement is your safest action and the fastest way to fix a weak position.

  • A valid move lights up before you commit, so you can read the lane first.
  • If a square is not highlighted, the move is not legal right now.
  • Use movement to claim space, protect shrines, and keep the enemy away from your altar.
Dragging a Raksha hero while valid move boxes are shown.
Selected hero
Safe landing squares
Movement preview: highlighted squares show exactly where the drag can end.
Step 4

Drag to Attack

Attacks use the same drag flow, but the target square belongs to an enemy.

  • If an enemy target opens over a god hero, you can attack that hero this turn.
  • If the enemy altar opens up, drag a god hero onto it immediately to pressure the round win.
  • Your altar cannot initiate attacks, so keep using hero tempo to threaten the finish.
  • After a good duel, look for the fastest follow-up instead of drifting away from the objective.
Dragging toward enemy pressure in Raksha.
Your pushed hero
Enemy pressure starts here
Enemy hero attack: climb the lane and strike when the enemy target opens.
A Raksha hero advancing toward the enemy altar.
Your pushed hero
Enemy altar
Altar attack: a clear lane to the altar is often the fastest win condition.
Step 5

Tap to Place a Skill

Skills are placed with a tap, not a drag, and the board will show the legal landing squares.

  • Tap your hero once to enter skill-target mode.
  • Highlighted squares show where that skill can be placed right now.
  • If you tap a non-highlighted square, the skill will not be placed.
Skill-target mode in Raksha with valid skill squares visible.
Tap your hero first
Legal skill squares
Skill placement: tap the hero first, then choose one of the highlighted squares.
Step 6

Read the Full Battle Screen

The board is only half the story. The side panels tell you who is safe, pressured, or ready to swing a turn.

  • The left and right player columns show HP, score, timer, and whose turn is active.
  • Use the hero cards to quickly read which god is still alive and ready to act.
  • Keep checking the center board and the side panels together instead of focusing on only one area.
The full Raksha active battle shell with board and player columns.
Full battle shell: the board and both side columns work together as one combat view.
Step 7

Play for the Altar, Not Just the Duel

Winning small trades matters, but altar pressure is what closes the round.

  • A duel win is strongest when it opens the route to the enemy altar.
  • If your own altar lane is open, defending is often better than chasing.
  • New players improve faster when they ask, "Does this move help my altar or threaten theirs?"
A Raksha hero threatening the enemy altar.
Your lane push
Finish at the altar
Altar pressure wins rounds faster than wandering for isolated picks.
Step 8

Watch the Shrines

Shrines can swing a close battle, but only if you can hold the lane safely.

  • Both shrines sit on the board from the start and reward control of the side lanes.
  • A shrine is strongest when you can protect the hero channeling on it.
  • Do not over-force a shrine if it leaves your altar lane open.
Opening Raksha board with shrines visible in the lane.
Order shrine
Chaos shrine
Shrines sit on the left and right side lanes and become valuable once both sides start trading space.
Step 9

Understand HP and Pressure

Raksha rewards good trades over time, not just one lucky turn.

  • A fallen god can cost HP depending on the current match settings and active blessings.
  • The score board tracks the series, while HP tracks how much pressure each side can still survive in the round.
  • If HP stays tied for the full admin Chaordic countdown, the arena starts compressing. On the standard 9x9 board that means 7x7 at Chaordic I, 5x5 at Chaordic II, then a 9x9 reset with rotating void tiles at Chaordic III.
  • You only get two tied-HP warnings before each collapse, and Chaordic X separately escalates through three stale-pattern warnings before punishing repetitive MOVE or SKILL target loops of up to three steps with 1 HP loss.
  • To prevent Chaordic, break the HP tie before the countdown ends and vary your move routes and skill targets instead of repeating the same one-, two-, or three-step rhythm.
Raksha battle shell showing the player columns with HP and score.
HP, score, and turn flow all live in the side columns during battle.
Step 10

Beginner Mistakes to Avoid

Most early losses come from a few repeated habits, and they are all fixable.

  • Do not drag too quickly. Let the highlighted legal squares guide you first.
  • Do not forget the enemy altar while you are chasing a duel.
  • Do not spend turns on a shrine or skill line if the enemy can punish your altar immediately.
  • Do not bounce the same hero through the same one-, two-, or three-step targets or cast the same skill pattern over and over, because Chaordic X escalates through three warnings before it starts removing HP.
Movement planning on the Raksha board.
Good Raksha turns are patient: read the legal squares, then commit.
Altar threat on the Raksha board.
Always check whether the altar lane matters more than one extra duel.
Step 11

Where to Practice Next

Use the practice modes to build clean habits before you jump into tougher matches.

  • Player vs Bot is the easiest way to learn movement, attacks, and skill placement.
  • Bot vs Bot helps you watch positioning patterns and shrine routes from start to finish.
  • When you can read the board without rushing, you are ready for more serious matches.
Raksha battle shell used as the main learning view for new players.
The same battle shell you see here is the one you will learn inside practice matches.

Need More Practice?

Open a practice match, repeat the early steps, then come back once the board feels natural.